ML 범용 명령어 - mnist 예제
IRIS Discovery Service의 DSL 명령어를 활용하여, mnist 숫자 이미지 다운로드부터 전처리, 학습, 예측, 평가, 서빙하는 시나리오입니다.
mnist 이미지 다운로드
mnist 숫자 이미지를 아래 사이트에서 다운로드 및 압축을 해제합니다.
https://github.com/myleott/mnist_png/blob/master/mnist_png.tar.gz
개인 객체 저장소에 업로드
다운로드 받은 이미지 파일을 개인 객체 저장소에 업로드합니다. 수동으로 업로드하거나 아래 스크립트를 실행합니다.
아래는 업로드하는 python 스크립트 예제 입니다. 모두 업로드하는데 1~2시간정도 소요됩니다.
- boto3 패키지가 필요합니다.
pip install boto3 - 아래 인자를 입력해주세요.
- testing : test 이미지 로컬 디렉토리 경로
- training : train 이미지 로컬 디렉토리 경로
- bucket : 개인 객체 저장소의 bucket
- prefix : 개인 객체 저장소의 key (상위 키)
- endpoint_url : 개인 객체 저장소의 url
- aws_access_key_id : 개인 객체 저장소의 access_key
- aws_secret_access_key : 개인 객체 저장소의 secret_access_key
import boto3
import os

local = {
'testing': '/home/oss/tensorflow/mnist_img/mnist_png/mnist_png/testing',
'training': '/home/oss/tensorflow/mnist_img/mnist_png/mnist_png/training'
}
obj_storage = {
    'bucket': 'user1',
    'prefix': 'mnist',
}
obj_setting = {
    'endpoint_url': 'http://192.168.102.140:9015',
    'verify': False,
    'aws_access_key_id': 'minio',
    'aws_secret_access_key': '??'
}

def upload_obj(cli, files, bucket, keys):
    if isinstance(files, str):
        files = [files]
    if isinstance(keys, str):
        keys = [keys]

    for i, (file, key) in enumerate(zip(files, keys), 1):
        try:
            cli.upload_file(file, bucket, key)
            if i % 100==0:
                print('{}개 완료'.format(i))
        except ClientError as e:
            raise Exception('upload key[{}, {}] fail. {}'.format(bucket, key, e))

def make_path(root_path, obj_storage_prefix):
    local_path_list = []
    obj_path_list = []

    for path, dirs, files in os.walk(root_path):
        for file in files:
            full_path = os.path.join(path, file)
            obj_path=full_path.replace(root_path, obj_storage_prefix)
            obj_path_list.append(obj_path)
            local_path_list.append(full_path)
    return local_path_list, obj_path_list

mc = boto3.client('s3', **obj_setting)

local_path, obj_path = make_path(local['testing'], obj_storage['prefix'])
upload_obj(mc, local_path, obj_storage['bucket'], obj_path)

local_path, obj_path = make_path(local['training'], obj_storage['prefix'])
upload_obj(mc, local_path, obj_storage['bucket'], obj_path)
연결정보 등록
개인 객체저장소를 활용하기 위해 연결정보를 등록합니다.
IRIS UI에서 아래와 같이 대시보드 , 연결정보 를 차례로 클릭합니다.
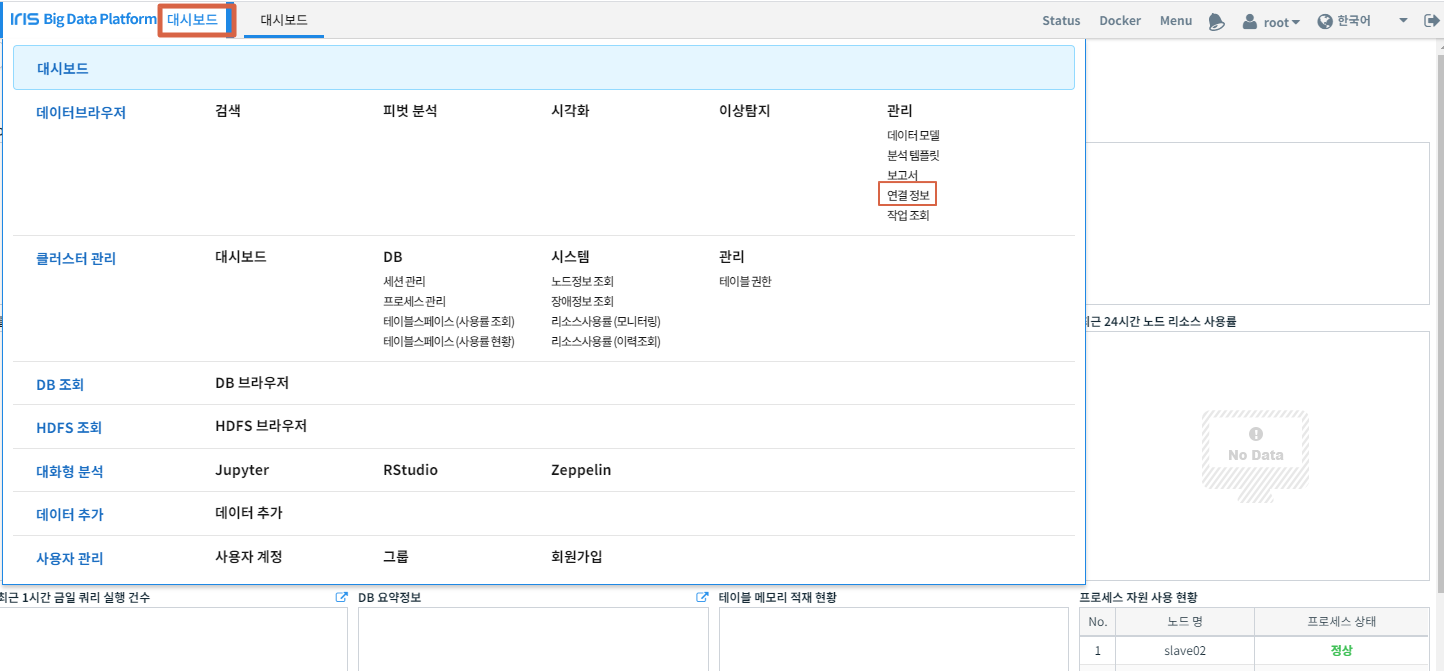
새 연결 정보를 클릭합니다.
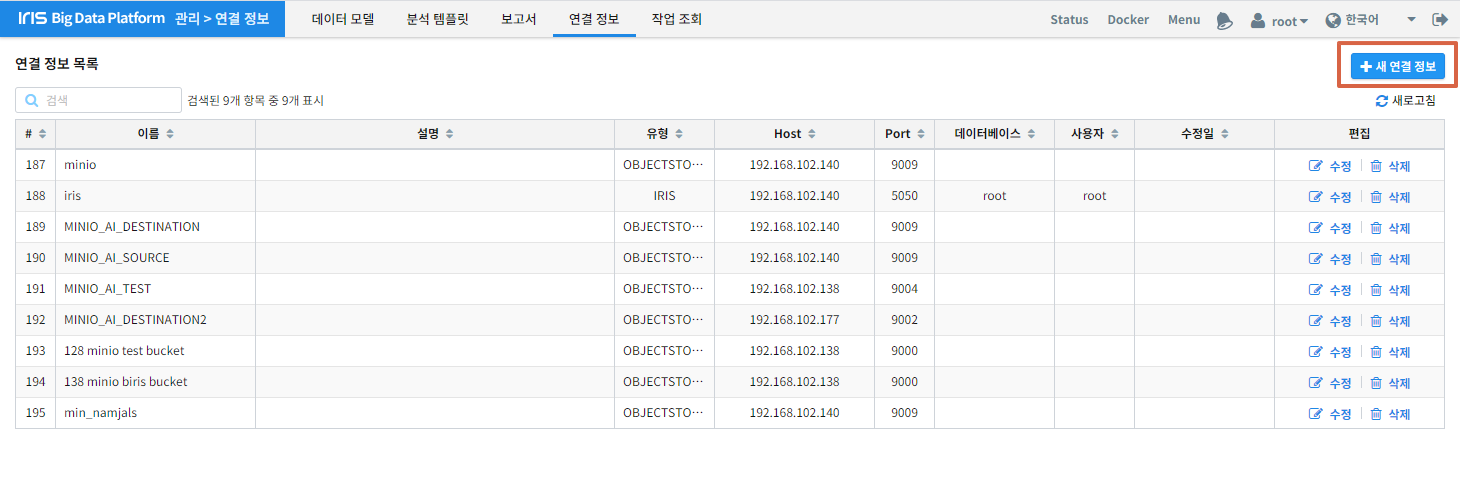
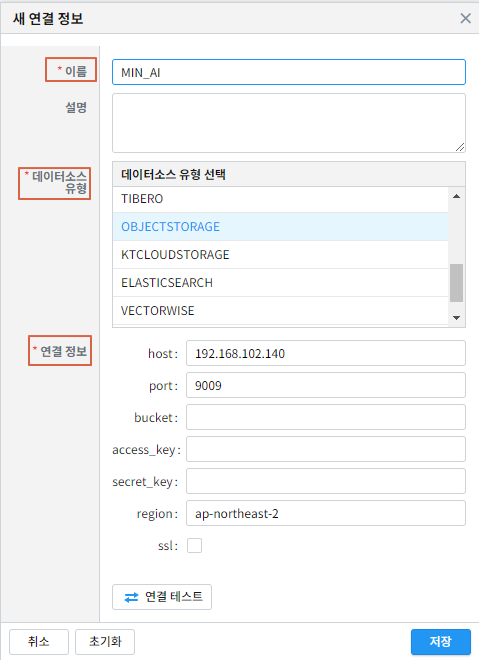
연결 이름, 데이터소스 유형, 연결정보를 입력하고 ``저장``버튼을 클릭합니다.
전처리
전처리는 IRIS Discovery Service의 img2tsv , splitter 를 사용합니다.
이미지 벡터화
mnist 숫자 이미지를 벡터 형태로 변환하여 tsv파일로 개인 객체 저장소에 저장합니다.
검색창에 아래 명령어를 각각 입력합니다.
- 객체저장소의 mnist/0 폴더는 one-hot 백터 형식으로 라벨을 [1,0,0,0,0,0,0,0,0,0]로 할당하며, tag는 zero라고 줍니다.
- 같은 방식으로 나머지 1~9 숫자 이미지도 벡터화합니다.
img2tsv src=OBJECTSTORAGE.MIN_AI:mnist/0 dst=tsv/0.tsv column_name=feature label=(label, [int32], [1,0,0,0,0,0,0,0,0,0]) tag=zero
결과
| total |
|---|
| 6796 |
img2tsv src=OBJECTSTORAGE.MIN_AI:mnist/1 dst=tsv/1.tsv column_name=feature label=(label, [int32], [0,1,0,0,0,0,0,0,0,0]) tag=one
img2tsv src=OBJECTSTORAGE.MIN_AI:mnist/2 dst=tsv/2.tsv column_name=feature label=(label, [int32], [0,0,1,0,0,0,0,0,0,0]) tag=two
img2tsv src=OBJECTSTORAGE.MIN_AI:mnist/3 dst=tsv/3.tsv column_name=feature label=(label, [int32], [0,0,0,1,0,0,0,0,0,0]) tag=three
img2tsv src=OBJECTSTORAGE.MIN_AI:mnist/4 dst=tsv/4.tsv column_name=feature label=(label, [int32], [0,0,0,0,1,0,0,0,0,0]) tag=four
img2tsv src=OBJECTSTORAGE.MIN_AI:mnist/5 dst=tsv/5.tsv column_name=feature label=(label, [int32], [0,0,0,0,0,1,0,0,0,0]) tag=five
img2tsv src=OBJECTSTORAGE.MIN_AI:mnist/6 dst=tsv/6.tsv column_name=feature label=(label, [int32], [0,0,0,0,0,0,1,0,0,0]) tag=six
img2tsv src=OBJECTSTORAGE.MIN_AI:mnist/7 dst=tsv/7.tsv column_name=feature label=(label, [int32], [0,0,0,0,0,0,0,1,0,0]) tag=seven
img2tsv src=OBJECTSTORAGE.MIN_AI:mnist/8 dst=tsv/8.tsv column_name=feature label=(label, [int32], [0,0,0,0,0,0,0,0,1,0]) tag=eight
img2tsv src=OBJECTSTORAGE.MIN_AI:mnist/9 dst=tsv/9.tsv column_name=feature label=(label, [int32], [0,0,0,0,0,0,0,0,0,1]) tag=nine
train/test 분리
img2tsv에서 생성한 tsv 파일을 train/test, 80 대 20 비율로 분리하여 개인 객체 저장소에 저장합니다. 추가적으로 label과 tag 컬럼으로 사전데이터(dict.tsv)를 생성합니다.
검색창에 아래 명령어를 입력합니다.
splitter src=OBJECTSTORAGE.MIN_AI:tsv train=(train.tsv, 0.8) test=(test.tsv, 0.2) dictionary=(dict.tsv, label, tag)
결과
| train | test |
|---|---|
| 54687 | 13793 |
test 데이터 등록
추후 예측에 활용하기 위해 splitter 명령어로 분리한 test데이터를 IRIS UI에 데이터 모델로 등록합니다.
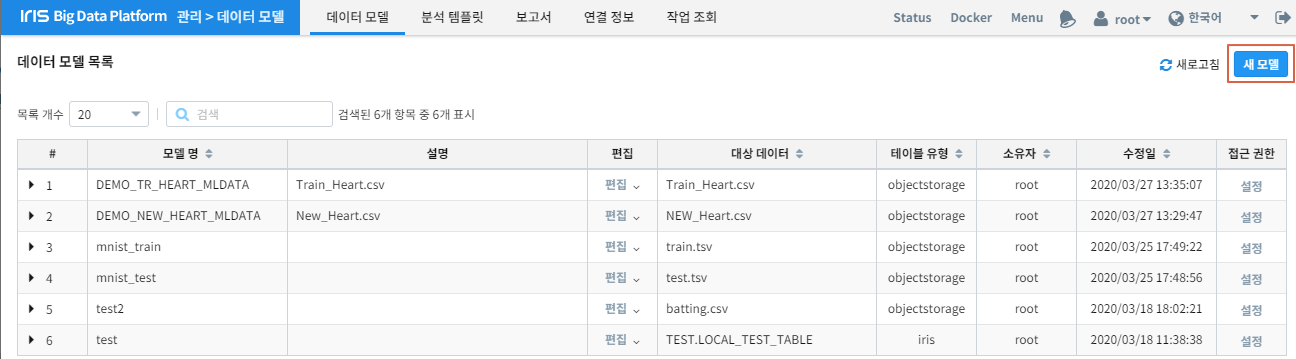
데이터모델 생성을 위해 대시보드 - 데이터모델 을 클릭합니다.
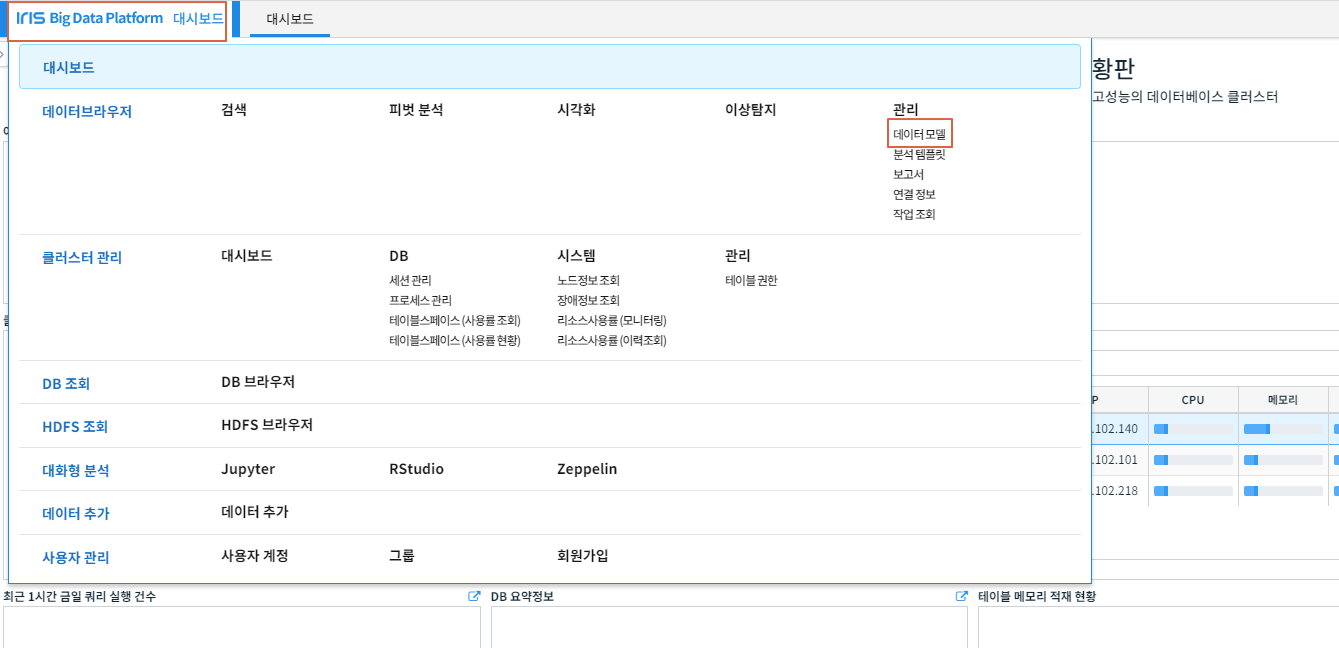
새 모델 을 클릭합니다.
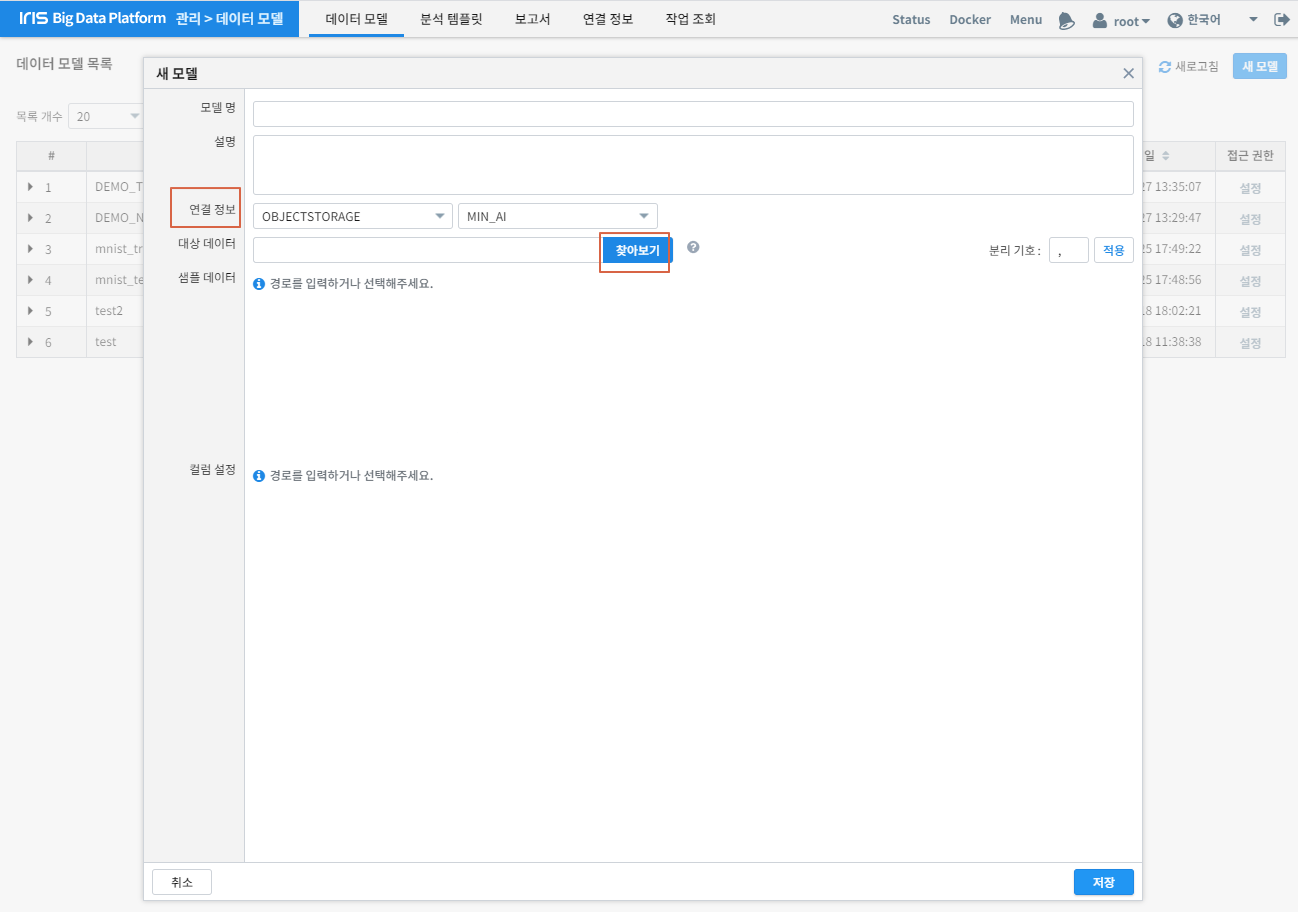
연결 정보 를 선택하고 테스트 데이터 선택을 위해 찾아보기 를 클릭합니다.
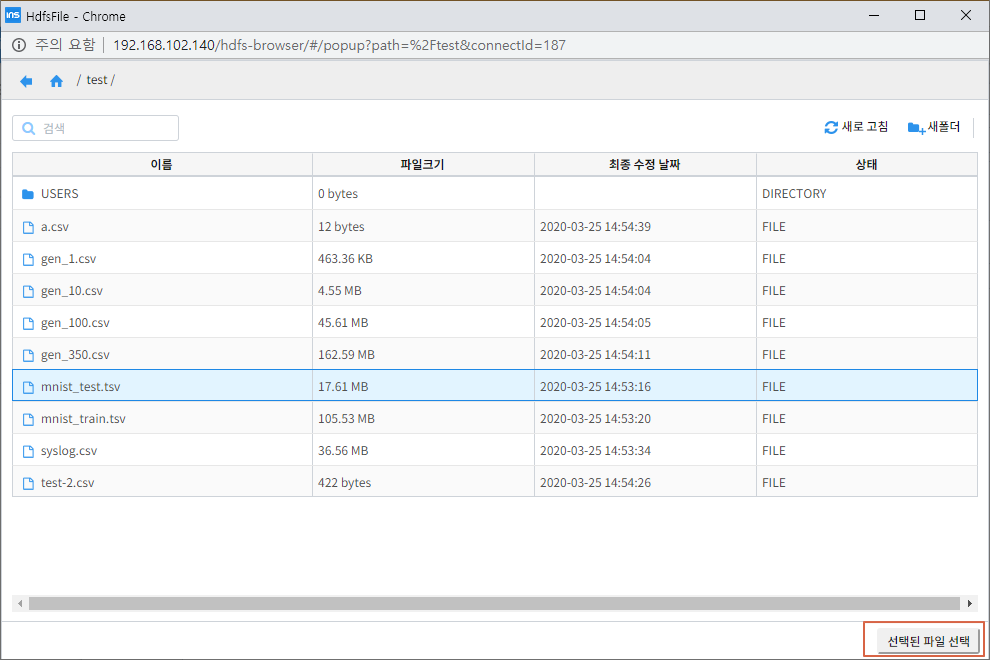
팝업되는 창에서 TEST데이터를 찾아 선택된 파일 선택 을 클릭합니다.
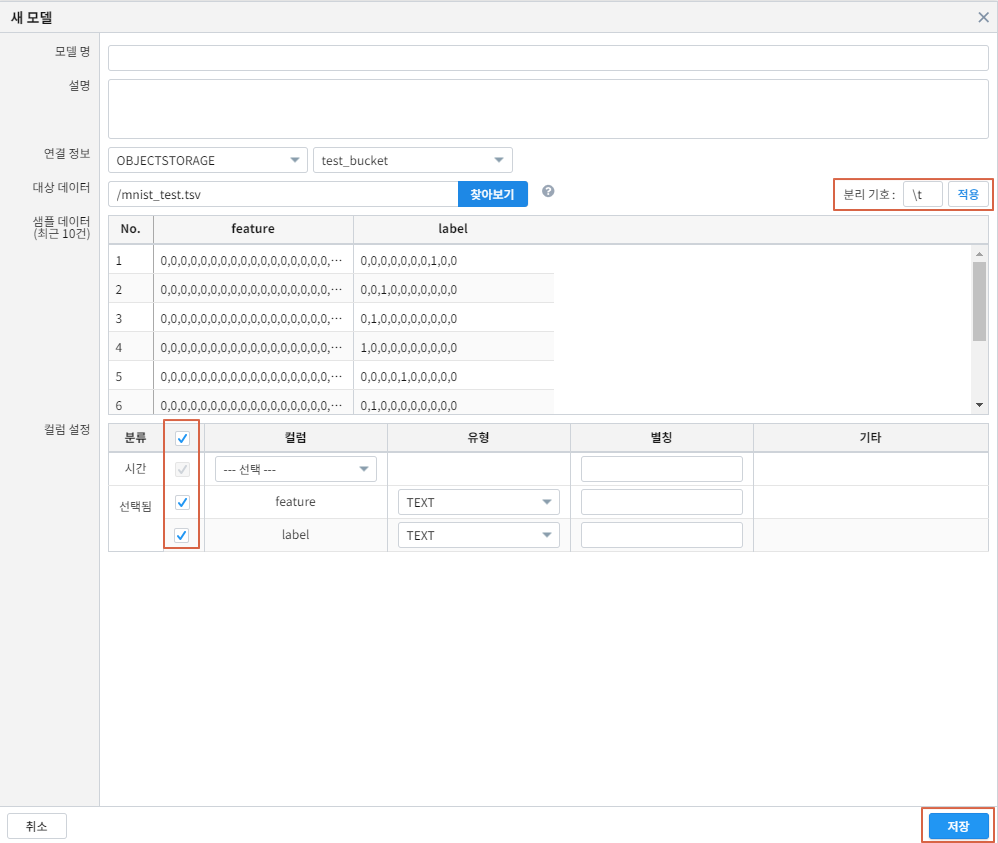
분리기호를 \t 수정 후, 적용 - 분류 체크 를 클릭합니다. 모델 명을 mnist_test 로 입력 후 저장 버튼을 클릭합니다.
학습
학습은 IRIS Discovery Service의 fit 를 사용합니다.
설정 업로드
아래 python 스크립트를 활용하여 학습을 위한 설정을 개인 객체저장소에 업로드합니다.
- boto3 패키지가 필요합니다.
pip install boto3 - 아래 인자를 입력해주세요.
- bucket : 개인 객체 저장소의 bucket
- key : 개인 객체 저장소의 key
- endpoint_url : 개인 객체 저장소의 url
- aws_access_key_id : 개인 객체 저장소의 access_key
- aws_secret_access_key : 개인 객체 저장소의 secret_access_key
- config : TFDeep 명령어 문서 를 참조하여 입력
import boto3
import json

bucket = 'user1'
key = 'angora_mnist_config.json'

obj_setting = {
    'endpoint_url': 'http://192.168.102.140:9015',
    'verify': False,
    'aws_access_key_id': 'minio',
    'aws_secret_access_key': '??'
}

config = """
{
  "env": {
    "num_executors": 1,
    "num_ps": 0
  },
  "model": {
    "network": {
      "backend": "tensorflow",
      "class_name": "Sequential",
      "config": {
        "layers": [
          {
            "class_name": "Conv2D",
            "config": {
              "activation": "relu",
              "batch_input_shape": [
                null,
                28,
                28,
                1
              ],
              "filters": 32,
              "kernel_size": [
                3,
                3
              ]
            }
          },
          {
            "class_name": "MaxPooling2D",
            "config": {
              "data_format": "channels_last",
              "dtype": "float32",
              "name": "max_pooling2d",
              "padding": "valid",
              "pool_size": [
                2,
                2
              ],
              "strides": [
                2,
                2
              ],
              "trainable": true
            }
          },
          {
            "class_name": "Flatten",
            "config": {
              "data_format": "channels_last",
              "dtype": "float32",
              "name": "flatten",
              "trainable": true
            }
          },
          {
            "class_name": "Dense",
          "config": {
              "activation": "relu",
              "activity_regularizer": null,
              "bias_constraint": null,
              "bias_initializer": {
                "class_name": "Zeros",
                "config": {
                  "dtype": "float32"
                }
              },
              "bias_regularizer": null,
              "dtype": "float32",
              "kernel_constraint": null,
              "kernel_initializer": {
                "class_name": "GlorotUniform",
                "config": {
                  "dtype": "float32",
                  "seed": null
                }
              },
              "kernel_regularizer": null,
              "name": "dense",
              "trainable": true,
              "units": 64,
              "use_bias": true
            }
          },
          {
            "class_name": "Dense",
            "config": {
              "activation": "softmax",
              "activity_regularizer": null,
              "bias_constraint": null,
              "bias_initializer": {
                "class_name": "Zeros",
                "config": {
                  "dtype": "float32"
                }
              },
              "bias_regularizer": null,
              "dtype": "float32",
              "kernel_constraint": null,
              "kernel_initializer": {
                "class_name": "GlorotUniform",
                "config": {
                  "dtype": "float32",
                  "seed": null
                }
              },
              "kernel_regularizer": null,
              "name": "dense_1",
              "trainable": true,
              "units": 10,
              "use_bias": true
            }
          }
        ],
        "name": "sequential"
      },
      "keras_version": "2.2.4-tf"
    },
    "loss": "categorical_crossentropy",
    "metrics": "accuracy",
    "optimizer": {
      "SGD": {
        "learning_rate": 0.001
      }
    },
    "format": "h5"
  },
  "dataset": {
    "train": {
      "type": "minio",
      "endpoint": "192.168.102.140:9015",
      "access_key": "minio",
      "secret_key": "minio123",
      "bucket": "user1",
      "path": "train.tsv",
      "format": "tsv",
      "header": true
    },
    "dictionary": {
      "type": "minio",
      "endpoint": "192.168.102.140:9015",
      "access_key": "minio",
      "secret_key": "minio123",
      "bucket": "user1",
      "path": "dict.tsv",
      "format": "tsv",
      "header": true
    }
  },
  "tensor": {
    "feature": {
      "shape": "(28, 28, 1)",
      "type": "float32"
    },
    "label": {
      "shape": "(10, )",
      "type": "float32"
    },
    "interpret": {
      "shape": "()",
      "type": "int32"
    }
  },
  "fit": {
    "input": {
      "dataset": "train",
      "feature": "feature",
      "label": "label"
    },
    "checkpoint": {
      "save_weights_only": true
    }
  },
  "interpret": {
    "dataset": "dictionary",
    "key": "label",
    "value": "tag"
  }
}

"""

conn = boto3.resource('s3', **obj_setting)
obj = conn.Object(bucket, key)
obj.put(Body=config)
학습
config에 앞서 업로드한 설정파일을 넣어 모델명을 tf_minist로하여 학습합니다.
검색창에 아래 명령어를 입력합니다.
fit deep batch_size=128 epochs=2 config=OBJECTSTORAGE.MIN_AI:angora_mnist_config.json into tf_mnist
결과
| losses | metrics |
|---|---|
| {‘loss’: 2.2735725229548427} | {‘accuracy’: 0.20473583} |
| {‘loss’: 2.150804412119167} | {‘accuracy’: 0.41432425} |
accuracy가 41% 입니다. 높이기 위해 epochs을 3번 더 주어 이어서 학습합니다.
검색창에 아래 명령어를 입력합니다.
fit deep batch_size=128 epochs=3 retrain=True config=OBJECTSTORAGE.MIN_AI:angora_mnist_config.json into tf_mnist
결과
| losses | metrics |
|---|---|
| {‘loss’: 1.9149726856615126} | {‘accuracy’: 0.5695675} |
| {‘loss’: 1.5214702637539697} | {‘accuracy’: 0.67936534} |
| {‘loss’: 1.1004468156504876} | {‘accuracy’: 0.76993394} |
평가
평가는 IRIS Discovery Service의 eval 를 사용합니다.
학습된 모델을 평가하기 위해 검색창에 아래 명령어를 입력합니다.
평가 데이터는 앞서 생성한 mnist_test 를 사용합니다.
model name = 'mnist_test' model_owner = root | eval deep tf_mnist feature=feature label=label rate=0.8 repeat=3
결과
| no | losses | metrics |
|---|---|---|
| 1 | {‘loss’: 0.8852438026895889} | {‘acc’: 0.8077567} |
| 2 | {‘loss’: 0.8139687060163571} | {‘acc’: 0.84133184} |
| 3 | {‘loss’: 0.818142257630825} | {‘acc’: 0.8341704} |
예측
예측은 IRIS Discovery Service의 predict 를 사용합니다.
학습된 모델로 예측을 위해 검색창에 아래 명령어를 입력합니다.
예측 데이터는 앞서 생성한 mnist_test 를 사용합니다.
model name = 'mnist_test' model_owner = root | predict tf_mnist feature
결과
| label | tag | feature | prediction | interpreted |
|---|---|---|---|---|
| 1,0,0,0,0,0,0,0,0,0 | zero | 0.0,0.0,0.0,0.0,0.0,0.0,0.0,0.0,0.0,0.0,0.0,0…. | 1,0,0,0,0,0,0,0,0,0 | zero |
| … | … | … | … | … |
배포
배포는 IRIS Discovery Service의 mlmodel deploy 를 사용합니다.
학습 모델을 버저닝하여 서빙합니다.
검색창에 아래 명령어를 입력합니다.
mlmodel deploy tf_mnist label='test'
결과
| result | latest_version | serving_name |
|---|---|---|
| on | 1 | root_tf_mnist |
예측 (서빙)
예측 (서빙)은 IRIS Discovery Service의 serving predict 를 사용합니다.
앞서 배포한 모델을 테스트데이터로 예측합니다.
예측 데이터는 앞서 생성한 mnist_test 를 사용합니다.
검색창에 아래 명령어를 입력합니다.
model name = 'mnist_test' | top 30 feature | serving predict tf_mnist col=feature shape=[(28,28,1)] layer_name=Conv1_input tag=(zero, one, two, three, four, five, six, seven, egiht, nine, ten)
결과
| label | tag | feature | predictions | probability | interpreted |
|---|---|---|---|---|---|
| 0,0,0,0,0,1,0,0,0,0 | five | 0.0,0.0,0.0,0.0,0.0,0.0,0.0,0.0,0.0,0.0,0.0,0… | [0.62, 0.01, 0.04…] | 0.62 | five |
| 1,0,0,0,0,0,0,0,0,0 | zero | 0.0,0.0,0.0,0.0,0.0,0.0,0.0,0.0,0.0,0.0,0.0,0… | [0.14, 0.03, 0.03…] | 0.38 | zero |
| … | … | … | … | … | … |
조회
조회는 IRIS Discovery Service의 mlmodel , serving status 를 사용합니다.
ml 모델 목록을 보기 위해 아래 명령어를 입력합니다. 배포한 모델은 serving 속성이 on 으로 됩니다.
mlmodel list
결과
| id | user | name | type | category | algorithm | serving | create | modified |
|---|---|---|---|---|---|---|---|---|
| 1 | root | tf_mnist | tf | classification | deep | on | 2019/11/19 00:11:22 | 2019/11/19 00:11:33 |
| … | … | … | … | … | … | … | … | … |
tf_mnist 모델을 상세 조회하기 위해 아래 명령어를 입력합니다.
mlmodel summary tf_mnist
결과
| name | value |
|---|---|
| id | 1 |
| user | root |
| name | tf_mnist |
| filename | saved_model.pb |
| format | saved_model |
| type | tf |
| category | deep |
| algorithm | deep |
| feature | feature |
| label | label |
| parameter | {‘batch_size’: 128, ‘epochs’: 5, ‘continuous’: ‘True’, ‘config’: ‘objectstorage.MINIO_AI_SOURCE:USERS/pjh0347/mnist/angora_mnist_config.json’} |
| evaluation | [] |
| cross_validation | {} |
| grid_info | {} |
| train_cnt | 55260 |
| elapsed | 569.0207872390747 |
| dictionary | dict.tsv |
| cdate | 20200323171102 |
| mdate | 20200324100417 |
| serving | off |
| serving_name | root_tf_mnist |
| state | DONE |
tf_mnist 모델의 서빙 상태를 조회하기 위해 아래 명령어를 입력합니다.
serving status tf_mnist
| version | state | label |
|---|---|---|
| 1 | AVAILABLE | test |